Showing posts with label Electronics. Show all posts

Saturday, 15 June 2013

SV650 - Front Subframe Part 2


The now welded front subframe, mounted on the bike with all the parts fitted to it. I did intend to get photos of it before putting it on the bike, but forgot to do so. 


Instrument panel mounted. Still have to make a surround for this - thinking of deep foam, reminisent of '90's sportsbikes.


 The adjustable haedlight and LED sidelights fitted. I still need to develop a mini wiring loom and work out how to mount the LED's, so thats one of the next stages.


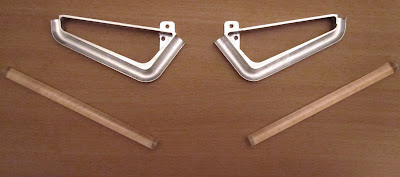
The LED light guides are still only temporarily mounted. The wing like brackets are made and ready to mount to the main subframe body, but the final position of the light guides may still change. We'll have to see with the front fairing and air inlet ducts fitted.


The Morimoto ballast pack for the HID headlight, neatly designed to mount in the side of the subframe. It comes with two M4 mounting bosses, but two cables ties seem far more suitable.


Trying to hide all the wiring loom behind the instrument panel so its out of sight when the fairing is fitted. Hidden most of it, but space is tight.

In other important news - we have rode the bike for the very first time. Only up and down a straight ride, just to run everything in. It all felt good and behaved as it should, so we need to finalise a few things now as we are keen to take it to a track!

Sunday, 23 December 2012

SV650 - Finer Details


One of the very first renderings shows some very discreet daylight running lights and it has been the intention from very early on to follow that on and incorporate on the bike. I'm no lighting expert, so have had to seek some advice (cheers Si!) but have experimented with various ideas to get to this point.


Following on from a simple solidworks model, it was time to CNC machine the aluminium light guide mounts from a solid billet. These will mount to the subframe and sit beside the main projector light.

All that needs to be done to these is to make up a mounting bracket and polish the light guide profile in order to reflect as much light as possible.


Next up, was to form a piece of acrylic rod to sit in the profile (a quick blast in the oven helped soften it) with some recesses machined in each end to recieve the LED's, which are currently wired into the loom on the bike, illuminating my test lights.

Below you can see the desired effect working with a low powered LED (I needed a semi lit room to prevent glare on the camera). The final light guide will be illuminated from either end with a polished back, so will emit plently of light and like rather funky sat in front of the air inlet ducts. Can't wait to see it on the bike!

Sunday, 1 July 2012

SV650 - Time for a Catch-Up!


So whats been going on with the project? - We've been working on the tricky bits which aren't worthy of photographing. The big achievement in the past month is that the bike now runs. We had to modify the loom in a few places as some of the electrical components have been repositioned and needed longer wiring and then there were a few issues with regard to fuelling/new tank/electrical connectors that had to be overcome, whilst absorbing a couple of extra weeks.

But, its good to hear it start up for the first time and see that everything works as it should. Here's some photos of some of the other work that has been on-going . . .
.

Pictured above we have the first fibreglass tank insert, mounted with the fuel filler cap in position. This will be used as a guide and some futher work will be done to the tank cover to get everything to match up and the surfaces to flow together nicely.


The front projector light, now fully wired up into the loom. This light certainly has some power, puts my car headlights to shame! Features both high and low beam in the one unit, and is housed in the aluminium surround that we machined, mounted onto the front subframe, all of which can be adjusted angle wise for optimum settings. Off this we will have the LED sidelights, which are now drawn up in CAD and ready to be machined, but they are not ready to be shown just yet!


Along with the front, the rear is all mounted and wired up. Tail and brake light again all in one unit, LED powered. Very pleased with this, we achieved the effect that was dreamed up during the concept stage of the project!

Tuesday, 15 May 2012

SV650 - Engines In!


Ah, now we have a rolling chassis together!

The engine is in, forks are on and the swingarm is in place. The bearings in the suspension rocker have been refreshed and the throttle and clutch cables have been hooked up. Even got round to bleeding the front brake at last - I must not get ahead of myself!


Whilst the dummy engine was in the frame we had the loom mocked up with it. Now its been modified as required (extended wiring to a few components) and documented, its just about ready to be fed inside and out the bike to get everything connected.

Time for some head scratching no doubt!

Saturday, 7 April 2012

SV650 - Molds & Looms


This week, we have completed our first mold for final manufacture. This piece is the feature for the tank, which also houses the fuel cap and acts as a top cover, sandwiching the tank cover between this and the aluminum fuel tank. 

The image below shows some of the bosses previously machined in Nylon now fully molded and ready to go along with a split line to indicate where the piece needs to be cut back to when released form the mold.


 With filler and resin curing, there has been plenty of time to make up all those pesky little brackets to hold coil packs, pressure switches, fluid pots etc and to start to get a grasp of the wiring loom and where it will all be located. Having made the frame narrower then standard and with a fuel tank which sits far lower, there was a certain amount of head scratching on how to get the main loom form the rear of the bike to the front, without it being too visible. 

There may need to be a few extensions to certain wiring/connections, but these have all been noted and the position of the fuse boxes and components confirmed. Now its just a case of TIG welding these mounts into place when the frame is next stripped down.


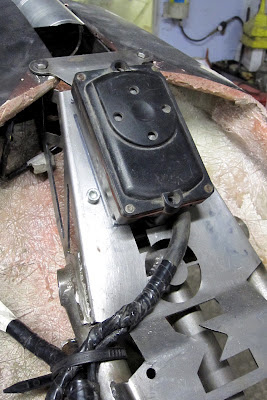
The fuse box neatly mounts onto the rear subframe, positioned on the underside of the seat pan. We also have another black box of electrics mounted on the underside of the rear subframe tail piece along with this box of magic on top.


PS, If anyone can identify what this black box is/does, could they please inform me. There are two SV650's in the workshop, both with '99 registration, yet one has this and one doesn't.