Showing posts with label Lasercutting. Show all posts

Thursday, 28 January 2016

Frame Components Arriving


The first of our parts to build some more frames have arrived. Above we have the 1 1/4" tubing along with a whole load of lasercut parts. These arrived this morning and were only ordered on Tuesday. We wern't in a rush for them, just great service!


These are the components before bending that will make up three frames and subframes. There are also some additional parts we had made to try to speed up the assembly & welding process as seen below.


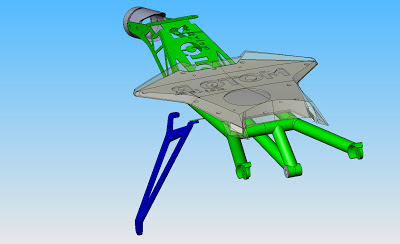
This setup was first seen on a set of Pierobon jigs, where they use lateral jigs to build both sides before final assembly onto the main jig. It looks far easier to hold all the tubing and weld the bosses in place, so following the success of our lasercut swingarm jig and a few hours in Solidworks to model up some jig parts up around our frame, we came up with this setup.

The 1 1/4" tubing drops on perfectly and there are also guides for the smaller diagonals (the red tubes are our old patterns and made to fit 1 3/8 tubing). We look forward to seeing how it goes. Now to await the arrival of the bosses and order some tubing.

Saturday, 19 July 2014

SV650 - Lasercutting, it makes my life easier.


With the entire design process for the swingarm done in CAD, it made sense for us to design the jig alongside it on the computer screen. 

I seem to remember very well spending weeks making the previous jig for the frame and didn't want to endure the same kind of timescale with the swingarm jig. So to avoid this, a very simple structure was designed which could be easily manufactured, consisting of lasercut steel plates, box section steel, stainless steel tie bars and aluminium bosses. 


The key to this simplicity is having the fully designed part and opting for lasercut plates. This means we could send them out, have them cut very accurately with no post processing required and when they return, simply fit them together. The steel box section acts as cross members which are welded in place to make the jig solid and space everything out. Then come the tie bars and aluminium boss, which locate the main fixing points on the swingarm.


Two weeks after sending drawings out, we received the lasercut parts.


Half an hour to cut some steel box section to length and then a few hours to make up some stainless tie bars and everything is mocked up loosely. 


That's as far as we got with it today, all that needs to be done now is to machine the aluminium bosses and weld the box section in place and the jig is good to go.


 Lasercutting, it makes my life easier!

Saturday, 22 March 2014

SV650 - Bending Metal


We've been busy bending this week in the workshop to get the fuel tank ready for welding (actually, the bending doesn't take very long at all, as we have markers cut into lasercut blanks and have designed the fuel tank to have very simple bends).

Above we have the main structure of the tank, with the internal baffle doubling up as the welding jig.


This is the lower portion of the tank which sits down the left side of the rear cylinder and contains the bosses for mounting the fuel level sensor and fuel petcock. it also helps to add vital overall capacity to the volume of the tank.


This is the re-designed fuel neck and filler cap flange. This has been changed from four welded bosses to a machined flange - just as quick to machine and requires minimal welding compared to four bosses. Lighter too!


The main structure again showing how the baffle locates into slots and below we have all the parts that go into making a Moto R Design SV650 fuel tank. Now to print off some drawings and send it all on its way to Simon who will be TIG welding it for us.


Wednesday, 5 March 2014

SV650 - Delivery of Lasercutting


The lasercut aluminium for the fuel tank and battery boxes has just arrived back from FabTech in Crowland. All the blanks in the picture above are now ready to be folded into each section of the fuel tank. Whilst waiting for these to arrive, we have been machining the various bosses, mounts and fuel neck flange ready to send it all off to the welders.

Below we have battery box blanks to make three of the new design. We would like to offer this product to Minitwin racers using the SV650, so if anyone wants to run one then let us know and we can get one on your bike.


Saturday, 7 December 2013

SV650 - Battery Box Re-design

So this may not be the most important thing in the world, but it has been bugging me since we built the bike up. 
 
There was nothing wrong with the old design of the battery box, it worked fine when it was on the bike, is proving to be strong enough and is positioned nicely between the front cylinder and fairing, it's just that on the odd occasion when we have needed to remove the battery, its been a pain in the ****.

The old design has the battery removal from the top, which works fine on the computer and workbench, but this space is occupied by a water hose on the bike, meaning the only way to remove it is by removing the mounting bolts and lowering the enitre battery box.


The new design allows the battery to be fitted & removed from the side, by removal of the "A" shaped side plate. Whilst re-designing, we chose to refine the design, to reduce the number of components and speed up manufacture. 


On this new design, only one bolt needs to be removed to remove the battery (opposed to four previously), theres one cross brace (opposed to two previously) and there are fewer welds to construct the main carrier. On the front mounts the rectifier and inside the battery is cushioned with foam.


The drawings have been sent off to be lasercut, so when we get those back we'll get one made and fitted to the bike. This should also fit the standard bike, with a couple of different sized mounting spacers, so we'll check that out to confirm, then if anyone wants one to fit there SV, give us a shout!

Saturday, 15 June 2013

SV650 - Front Subframe Part 2


The now welded front subframe, mounted on the bike with all the parts fitted to it. I did intend to get photos of it before putting it on the bike, but forgot to do so. 


Instrument panel mounted. Still have to make a surround for this - thinking of deep foam, reminisent of '90's sportsbikes.


 The adjustable haedlight and LED sidelights fitted. I still need to develop a mini wiring loom and work out how to mount the LED's, so thats one of the next stages.


The LED light guides are still only temporarily mounted. The wing like brackets are made and ready to mount to the main subframe body, but the final position of the light guides may still change. We'll have to see with the front fairing and air inlet ducts fitted.


The Morimoto ballast pack for the HID headlight, neatly designed to mount in the side of the subframe. It comes with two M4 mounting bosses, but two cables ties seem far more suitable.


Trying to hide all the wiring loom behind the instrument panel so its out of sight when the fairing is fitted. Hidden most of it, but space is tight.

In other important news - we have rode the bike for the very first time. Only up and down a straight ride, just to run everything in. It all felt good and behaved as it should, so we need to finalise a few things now as we are keen to take it to a track!

Saturday, 18 May 2013

SV650 - Front Subframe Part 1


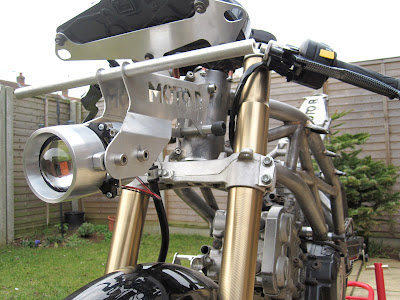
The front subframe - designed to support the headlight and sidelights whilst holding the instrument panel in position, carrying the headlight ballast pack, mounting the lock-stops & mirrors along with supporting the front fairing. That's a lot of functions for such a small lightweight piece, so lets hope we have got the design right.


The subframe has been extensively re-worked in CAD, due to a number of modifications from the very original piece we mocked up. It's mounted lower on the headtube, to clear the ignition barrel and support the lock-stops better, shorter in length and made from 3mm, rather than 2mm sheet aluminium. It also has provision for the sidelight mounting brackets and a simplified design for the uprights to support the top of the front faring. We also decided to go with a two part main structure which will be welded along the centre, just to make it easier to bend during manufacture.


 Lasercut parts returned, so time to bend up each half of the main structure.


Both sides have an interlocking face so they can't possibly be misaligned. This joint will then be TIG welded.


A comparison against the original (modified) subframe.


On the front of the bike with the cross brace fitted to locate the lower mount on the front fairing. We also have the headlight unit fitted. These two elements are key to the structure becoming rigid.


The riders view, with the instrument panel in place. The instrument panel sits on its own mount that is riveted in place and then welded to the two uprights that will come up along either side, where those holes are.


Fairing test fit around the initial parts of the subframe. A little awkard to get everything aligned and where we wanted it. Lock-stops also fitted and limited turning circle achieved!

Next time, we'll get the uprights in place and have this all welded and on the bike with photos.


Saturday, 11 May 2013

SV650 - Just An Exhaust Hanger


It's just an exhaust hanger, but there are also a few other finished bits to highlight too. The bike is progressing well now that the composite work is all done and I'm a bit more in my comfort zone. In the next few weeks, I'll get some photos up of the front subframe completion, more details on the lighting and some more photos of final trims of the bodywork.


CAD images are always exciting, so here are some screenshots of the exhaust hanger design on the rear subframe assembly.


Below is a photo of the exhaust hanger on the bike. Also of note is the finished stainless link pipe, now fully welded and given a brushed finish. The completion of these two parts meant that the Arrow titanium silencer could be fitted and the engine run. Sounds real good! If i can work out how to get a sound clip up, I may upload a teaser.


Whilst we were having the exhaust hanger lasercut, we had a few other parts done including the heel plates and some front subframe components. The front subframe had never been finalised, due to the need of having an actual front fairing to work out the correct location of the mounting points. Now we have this, the subframe was refined and finalised in CAD. Some of these parts had a large enough change to warrant being lasercut once again, but this time in thicker 3mm aluminium. More on all these developments next time.


Moto-R Design heel plates!
 

Saturday, 3 March 2012

SV650 - What's Happening?


What's happening - lots of little things, all of which seem to be very time consuming!

So the past few days we have been working on getting everything onto the bike and mounting it all to the new frame. We have had some help from Simon who has been looking at getting the wiring loom all sorted and working out where everything can fit, using the black SV as a reference.


This is our battery box that we had lasercut a few months back out of aluminum, now TIG welded up and mounted on the frame. It sits down low on the right-hand side of the front cylinder to help bring the weight lower and it also has the rectifier mounted to the front. This has been designed so it will also fit the mounts on the standard frame.

The radiator is now mounted too. We needed it in place on the bike to get the location right with the wheel clearance. We have also made a few simple aluminum brackets that mount to the frame/engine to support the coil packs, fuel pump and anything else that needs to be bolted on.


The fuel tank has now been tacked together. In a quest to get fuel capacity as high as possible, big headaches have been caused in getting it to fit within the frame, so it has been gradually getting trimmed to make it fit easier and allow for other pieces such as the wiring loom to get past. It has been very frustrating, but it's not far off fitting now with the addition of a few rubber mountings. 

Monday, 20 February 2012

SV650 - The Dry Build Commences


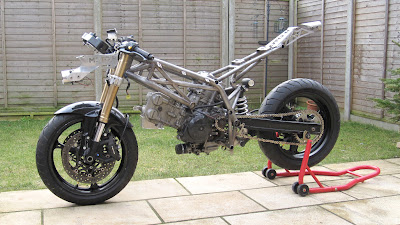
Here it is! We have started to do a dry build of all the parts manufactured so far to ensure they all fit when it comes round to put a running engine into the bike. 

The frame was always going to fit, but the front and rear subframes have been designed in CAD, so we need to have them on the bike to ensure everything aligns and the bodywork fits as it should. It also gives us chance to check all the brackets on the frame, fit the battery box, get the radiator mounts in place, locate the fuel tank . . . the list goes on.


Below you can see how the front subframe fits with the instrument panel and adjustable headlight unit. Theres still a few more pieces to TIG weld on to fully support the front fairing. The lock-stops have also been integrated into the aluminum piece


The comparison below gives you an idea of how the frame has evolved from initial mock-up, through the CAD process and into a prototype frame. Main differences are larger radius' bends in the tubes, removal of a few bosses deemed unnecessary, addition of headstock gussets & side stand bracket sand obviously a higher grade material that has been fully TIG welded.


More photos as and when progress happens!