Showing posts with label Lighting. Show all posts

Saturday, 15 June 2013

SV650 - Front Subframe Part 2


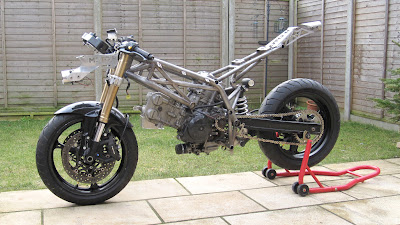
The now welded front subframe, mounted on the bike with all the parts fitted to it. I did intend to get photos of it before putting it on the bike, but forgot to do so. 


Instrument panel mounted. Still have to make a surround for this - thinking of deep foam, reminisent of '90's sportsbikes.


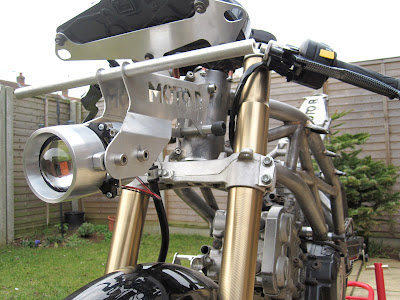
 The adjustable haedlight and LED sidelights fitted. I still need to develop a mini wiring loom and work out how to mount the LED's, so thats one of the next stages.


The LED light guides are still only temporarily mounted. The wing like brackets are made and ready to mount to the main subframe body, but the final position of the light guides may still change. We'll have to see with the front fairing and air inlet ducts fitted.


The Morimoto ballast pack for the HID headlight, neatly designed to mount in the side of the subframe. It comes with two M4 mounting bosses, but two cables ties seem far more suitable.


Trying to hide all the wiring loom behind the instrument panel so its out of sight when the fairing is fitted. Hidden most of it, but space is tight.

In other important news - we have rode the bike for the very first time. Only up and down a straight ride, just to run everything in. It all felt good and behaved as it should, so we need to finalise a few things now as we are keen to take it to a track!

Sunday, 23 December 2012

SV650 - Finer Details


One of the very first renderings shows some very discreet daylight running lights and it has been the intention from very early on to follow that on and incorporate on the bike. I'm no lighting expert, so have had to seek some advice (cheers Si!) but have experimented with various ideas to get to this point.


Following on from a simple solidworks model, it was time to CNC machine the aluminium light guide mounts from a solid billet. These will mount to the subframe and sit beside the main projector light.

All that needs to be done to these is to make up a mounting bracket and polish the light guide profile in order to reflect as much light as possible.


Next up, was to form a piece of acrylic rod to sit in the profile (a quick blast in the oven helped soften it) with some recesses machined in each end to recieve the LED's, which are currently wired into the loom on the bike, illuminating my test lights.

Below you can see the desired effect working with a low powered LED (I needed a semi lit room to prevent glare on the camera). The final light guide will be illuminated from either end with a polished back, so will emit plently of light and like rather funky sat in front of the air inlet ducts. Can't wait to see it on the bike!

Sunday, 1 July 2012

SV650 - Time for a Catch-Up!


So whats been going on with the project? - We've been working on the tricky bits which aren't worthy of photographing. The big achievement in the past month is that the bike now runs. We had to modify the loom in a few places as some of the electrical components have been repositioned and needed longer wiring and then there were a few issues with regard to fuelling/new tank/electrical connectors that had to be overcome, whilst absorbing a couple of extra weeks.

But, its good to hear it start up for the first time and see that everything works as it should. Here's some photos of some of the other work that has been on-going . . .
.

Pictured above we have the first fibreglass tank insert, mounted with the fuel filler cap in position. This will be used as a guide and some futher work will be done to the tank cover to get everything to match up and the surfaces to flow together nicely.


The front projector light, now fully wired up into the loom. This light certainly has some power, puts my car headlights to shame! Features both high and low beam in the one unit, and is housed in the aluminium surround that we machined, mounted onto the front subframe, all of which can be adjusted angle wise for optimum settings. Off this we will have the LED sidelights, which are now drawn up in CAD and ready to be machined, but they are not ready to be shown just yet!


Along with the front, the rear is all mounted and wired up. Tail and brake light again all in one unit, LED powered. Very pleased with this, we achieved the effect that was dreamed up during the concept stage of the project!

Monday, 20 February 2012

SV650 - The Dry Build Commences


Here it is! We have started to do a dry build of all the parts manufactured so far to ensure they all fit when it comes round to put a running engine into the bike. 

The frame was always going to fit, but the front and rear subframes have been designed in CAD, so we need to have them on the bike to ensure everything aligns and the bodywork fits as it should. It also gives us chance to check all the brackets on the frame, fit the battery box, get the radiator mounts in place, locate the fuel tank . . . the list goes on.


Below you can see how the front subframe fits with the instrument panel and adjustable headlight unit. Theres still a few more pieces to TIG weld on to fully support the front fairing. The lock-stops have also been integrated into the aluminum piece


The comparison below gives you an idea of how the frame has evolved from initial mock-up, through the CAD process and into a prototype frame. Main differences are larger radius' bends in the tubes, removal of a few bosses deemed unnecessary, addition of headstock gussets & side stand bracket sand obviously a higher grade material that has been fully TIG welded.


More photos as and when progress happens!

Tuesday, 15 November 2011

SV650 - We've got lights


 The rear light unit arrived a few days back and we wanted to see how the final thing was going to look, so spent some time machining the aluminum housings from the CAD data and were so excited, we just had to put it up here!


 The front bi-xenon projector has a specially machined aluminium housing that screws together. Both halves are then externally connected which acts as the support and allows for the light angle adjustment. The projector mounting plate is quite large, so we've had to machine out some sections of the rear half to get the unit as compact as possible.


 The rear light is very similar in styling and also made in two halves which screw together, locking the LED light unit in place. This bolts directly in the rear subframe, sitting within the top of the tail piece so is a real feature of the back end.

Looking forward to the day that we can light them up on the bike!
Now wheres my electrical engineer . . .